Wednesday 19 November 2014

Vegan Banana Granola Bars

Another day, another leftover banana recipe for you! This time it's super simple granola bars, which are also good for you. 

This recipe is really so easy, it's pretty much just mixing everything together in a bowl.
Ingredients

1 Cup Dates
2 Cups Oats
2 Tbsp Peanut Butter
4 Tbsp Maple Syrup
1 Cup Almonds
1/2 Cup Dried Apricots (chopped into small chunks)
1 Overripe Banana

1) Start by toasting your oats and almonds at 180c for around 15 minutes (keep an eye on them so they don't burn)

2) Blend the dates, peanut butter and maple syrup together in a food processor until it forms a paste.

3) Then add your banana to the mixture and blend again until combined.

4) Pour the mixture into a bowl and add your toasted almonds and oats. Mix together with your hands (you can use a spoon if you so wish) until the oats and almonds are equally distributed. 

5) Spoon the mixture into a tin lined with baking parchment. I used a square one, but you can really use whatever you have lying around in the cupboards.

5) Refrigerate the mixture until fully cooled through.

6) Cut into segments and enjoy! 

Thursday 30 October 2014

'Bloody' Halloween Chocolate Cupcakes

Well as the eve of Hallow draws ever closer, I took to the kitchen to rustle up some ghouly treats. I got the idea of filling the inside of the cake with jam from Cupcake Jemma's youtube page. I wanted the centre to be a 'bloody' surprise.

I topped with a indulgent vanilla cream cheese icing and more splattering of the jammy blood.

I was happy with how they came out, and think that would be perfect for children and grown ups alike (I took mine along to a friends for an eve of scary movies and they went down a treat).

Ingredients

Makes 24 small cupcakes

175g Plain Flour
30g Cocoa Powder
185g Caster Sugar
1/2 Tsp Bicarbonate of Soda
Pinch of Salt
75g Chocolate (melted and cooled)
1 and a half Eggs (Do this by whisking up one of the eggs and adding half the mixture)
100ml Coffee (cooled - I used a Nespresso machine to get this, but you can also use instant coffee.)
100ml Buttermilk
100ml Coconut Oil (If you don't have this then use vegetable oil)
Some store bought jam (of course you can make your own). I used the berries and cherries Bonne Maman one. 

1. Preheat the oven to 150c. Then sift the dry ingredients into a large bowl.

2. In a large jug whisk all the wet ingredients together. Then add the wet ingredients to the dry a little at a time and mix.

3. When the mixture is fully incorporated ladle out into the cupcake cases. Be careful at this point because it can et quite messy...

4. Bake the cakes in the oven for around 20 minutes, or until a skewer comes out clean. Allow them to cool.

5. When the cakes are cooling start to make the cream cheese frosting. If you want to find out how to do this, then check out my last post

6. Once the cakes are completely cool you now want to make some room for the jam filling. I did this by using the end of a biro (cleaned!) and pushed it into the cake and wiggled it around a bit (innuendo bingo much!?), thus creating room for the jam.

7. Then pipe the jam into the centre of each cupcake. 

8. Then ice the cupcakes whichever way you like. I used a piping bag to do mine 'cause I wanted to. 

9. To finish them off I popped on some 'Halloweeny' sweets and added a splattering of jam.
So there you go. Some scary little treats ready for your consumption. Happy Halloween everyone!

Thursday 23 October 2014

Pumpkin Spice Cupcakes

Well who am I to avoid the autumnal bandwagon? Yup that's right. Got some autumn themed cupcakes for you today & they are SO yum. Definitely a non-fast day kinda treat. But oh boy are they good.

We all know too well how much those Americans love their pumpkins, and these little goodies embrace them with open arms (and a touch of winter spices). Seriously when these are baking away in the oven, it will make your entire kitchen smell of autumn yummy-ness.

Ok ok enough of the elaborate descriptions. Let's get to it!

Ingredients

Makes 6 Large Cupcakes (I made mine in a muffin tin)

125g cooked, cooled and pureed Pumpkin (I bought a whole one and roasted it in chunks in the oven for approx 20 minutes at 180c)
55g Butter 
1 Egg
140g Plain Flour
1/2 Tsp Ground Cinnamon
1/4 Tsp Ground Ginger
1/4 Tsp Ground Cloves
1/4 Tsp Ground Allspice
Pinch of Salt
1/2 Tsp Baking Powder
1/4 Tsp Bicarbonate of Soda
110g Golden Caster Sugar
50ml Whole Milk

For the Icing;

35g Softened Unsalted Butter
60g Full Fat Cream Cheese (has to be full fat - lighter versions just go runny)
210g Sifted Icing Sugar

For the Candied Pumpkin Seeds;

2 Heaped Tablespoons of Pumpkin Seeds
1/2 Tablespoon Caster Sugar
1 Tsp Vanilla Extract

1) Start by browning your butter. Do this by placing the butter in a pan on medium heat, stirring occasionally until the butter forms little brown particles at the bottom of the pan. When done it should smell nutty, or as I found, like a daim bar. YUM! This just gives the cupcakes that extra depth of flavour. This step can be skipped, just make sure your butter is really soft, or even melt it in the microwave until liquid.

2) Make sure your butter has cooled, then place in a bowl with the pumpkin and egg. Mix until combined.

3) Then sift all the dry ingredients into the bowl and fold until fully combined. Then add the milk, a little at a time.

4) Divide into your cupcake tins. As mentioned before I used a muffin tin to have supersized cupcakes, but you can use whatever you have lying around in the cupboard. 

5) Bake at 175c for around 20 minutes, but start checking them after around 10. Once done they should spring back when poked (not too hard now, gently does it.) 

6) When you're satisfied with the springy-ness of your muffins remove from the oven and place on a cooling wrack.

7) As the cupcakes cool, it's time to focus on the decoration for this spicy treats. Take a non- stick pan and place the pumpkin seeds into the pan. Then sprinkle on the half tablespoon of caster sugar over. Put the pan on a high heat and allow the sugar to melt. As it does this mix the seeds until all the sugar has melted. Place on a sheet of greaseproof paper to cool.

8) Now we're going to take our attention to the delicious vanilla cream cheese topping. Place the softened butter in a bowl and using your paddle attachment (or freehold electric whisker) cream the butter for around 2 minutes, basically until the butter is lighter in colour.

 9) Then add your cream cheese and mix again for another minute or so. Then sift in half the icing sugar (I would suggest mixing by hand to begin with, unless you'd enjoy your kitchen resembling winter wonderland) and beat together for another 2 minutes. Then sift the second part of the mixture (mixing in by hand again to prevent a second snow blizzard) and beat for a further 2 minutes. Finally mix in the teaspoon of vanilla extract and mix until fully incorporated.

10) Once your muffins are completely cool, decorate with the cream cheese frosting. I piped mine on but you can slather it on with a spoon, or small knife, or with your pinkie finger, it really is up to you.

11) Once the little beauties are covered sufficiently in the frosting then place some of the candied pumpkin seeds atop the cupcakes and voila! Pumpkin spice cupcakes. 

12) This is the time to stick the kettle on and show off your amazing creations, potentially on your chosen social media page. This is assuming that you have more willpower than me, of course there is no judgement in not being able to resist shoving one in your mouth before you can say instagram.
I enjoyed my cupcake with Jamie's Comfort Good & deciding what to cook for dinner.
Well well I hope you enjoyed this little recipe, and merry Autumn to you, one and all. See you soon for more recipes soooon!  

Wednesday 22 October 2014

Banana Nut Granola

Hey guys. Apologies for the break in posts. Took a couple weeks off housesitting in the countryside and in the process lost my blogging mojo. Saying that, I'm now back on the wagon, and as I type this wonderful smells are wafting from the oven.

I wanted to get back into the swing of things with one of my favourite go to granolas. As i have mentioned a few times before... bananas tend to get over ordered online and end up sitting in the fruit bowl until they turn black and mushy and inedible.

So I've made it my missions to create as many mouldy banana friendly recipes as possible.

This banana nut granola is the best as it keeps for several weeks, unlike most of my banana bread recipes.

I also love me some breakfast granola, you can't go wrong with some greek yoghurt with some of this banana-ery crunchy treat on top.

Well, now we've got all the technicalities out of the way let's get to it!

Ingredients

3 Cups of Jumbo Oats

1 Cup Rye Oats (If you can't get hold of these just replace with another cup of jumbo oats)
1 Tablespoon Cinnamon
1 Banana (mashed)
1 Cup Pecans
1 Cup Almonds
1/4 Cup Coconut Oil
1/4 Cup Honey
1/2 Cup Raisins
1/2 Cup Dried Apricots
1/4 Cup Banana Chips

1) Measure the dry ingredients into a bowl (minus the dried fruits). Then add the mashed banana and mix until full incorporated.

2) Add the oil and syrup and mix again. Spread evenly on a large tray and bake in the oven at 145c for around 40 minutes, or until a nice brown colour.

3) Remove from the oven and mix in the dried fruits. At this point feel free to add any kinds of dried fruits you like.

4) Attempt to exercise self control and allow to cool completely before you enjoy.

Friday 3 October 2014

Dairy Free Banana Bread

Another day, another bowl of mouldy bananas. This week I've shaped them into this delectable dairy free banana bread.

It's so simple to make as it's all made within one bowl (which means less washing up, score!)
Ingredients
3 Large Overripe Bananas
1 Egg
1 Tsp Vanilla Extract
3 Tbsp Coconut Oil (or Olive Oil)
2 Tbsp Honey
50g Dark Brown Muscavado Sugar
3 Tsp Baking Powder
Pinch of Salt
1 Tbsp Cinnamon
300 ml Almond milk (or dairy milk)
450g Plain Flour
200g Rye Oats (you can use normal oats as well)

1) Preheat the oven to 170c. Mash the bananas in a large bowl. Whisk in the egg and add the vanilla extract, oil, honey and mix thoroughly.

2) Fold in the dry ingredients and pour into a greased loaf tin. Bake in the oven for around an hour, or until a skewer comes out dry (there will be some residue on the skewer as it's a fairly wet and heavy batter).

3) Remove from the oven and allow to cool for 10 minutes or so. Then turn out onto a wire rack to cool completely. 
 
Enjoy this loaf toasted for breakfast, or with a mug of tea for an afternoon pick me up.

Wednesday 1 October 2014

GBBO Swedish Tea Ring


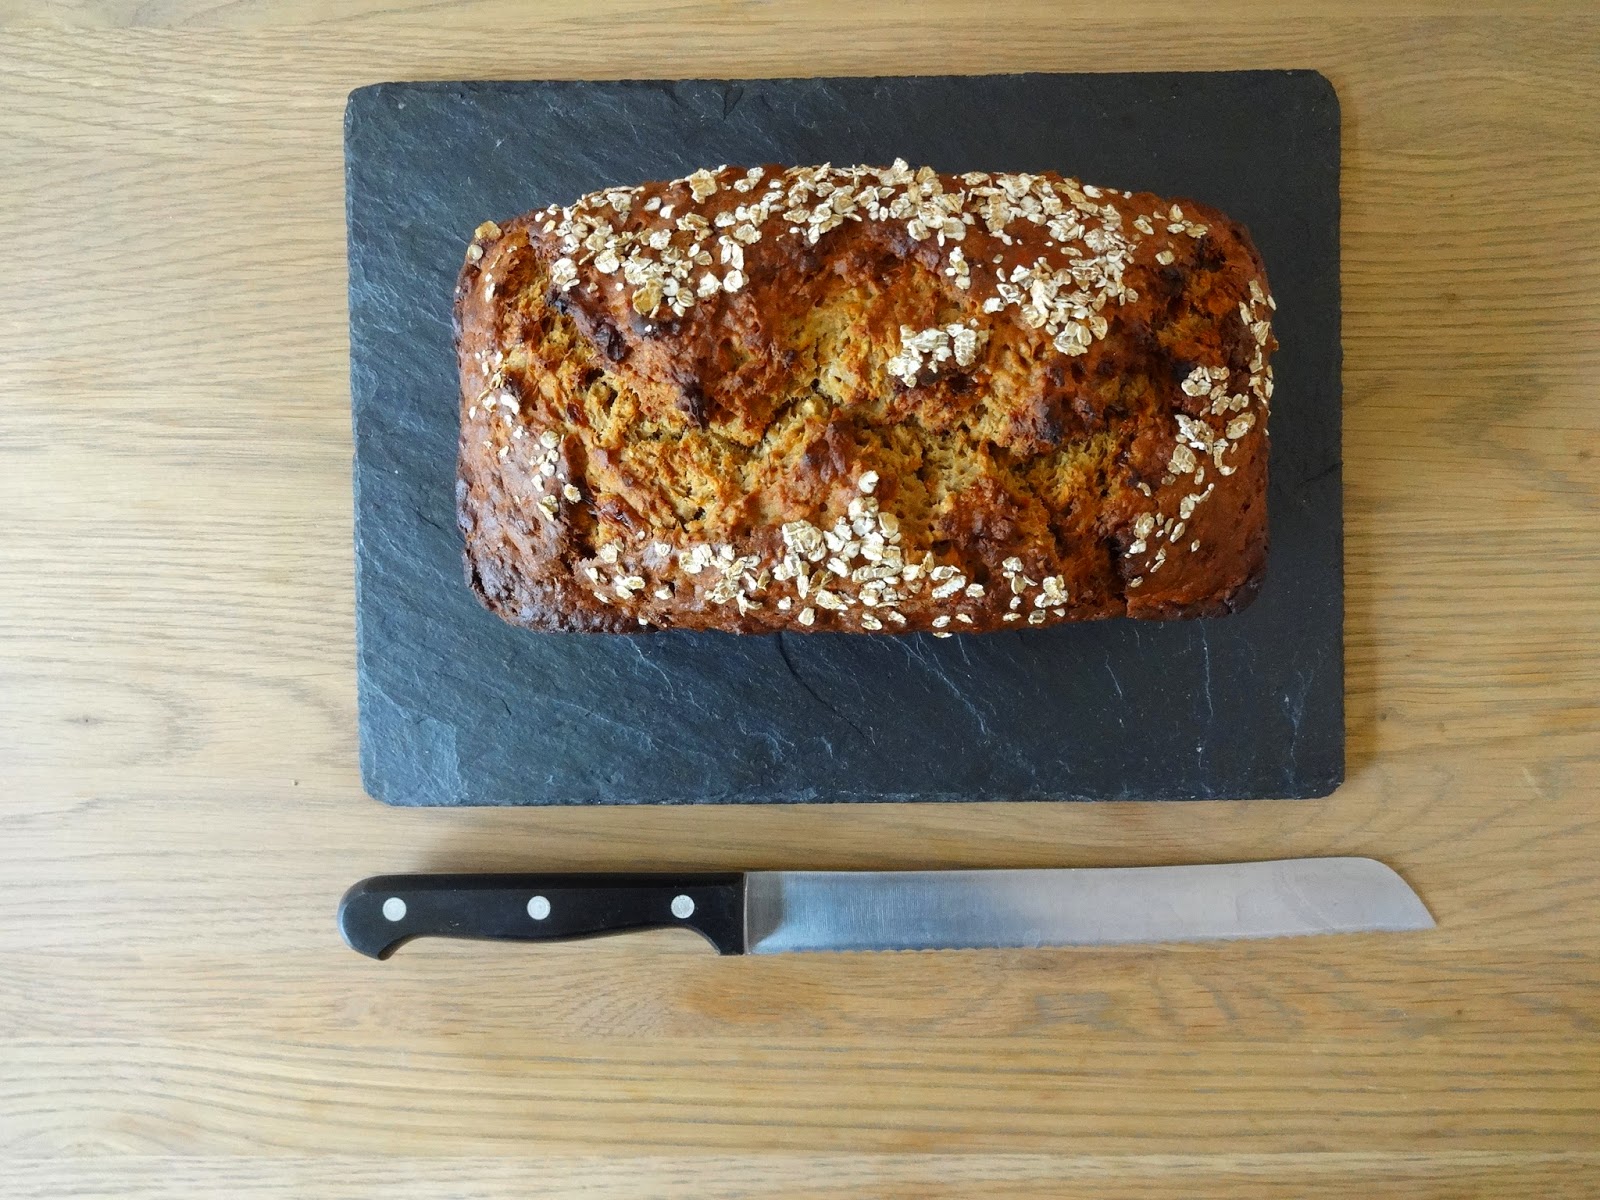
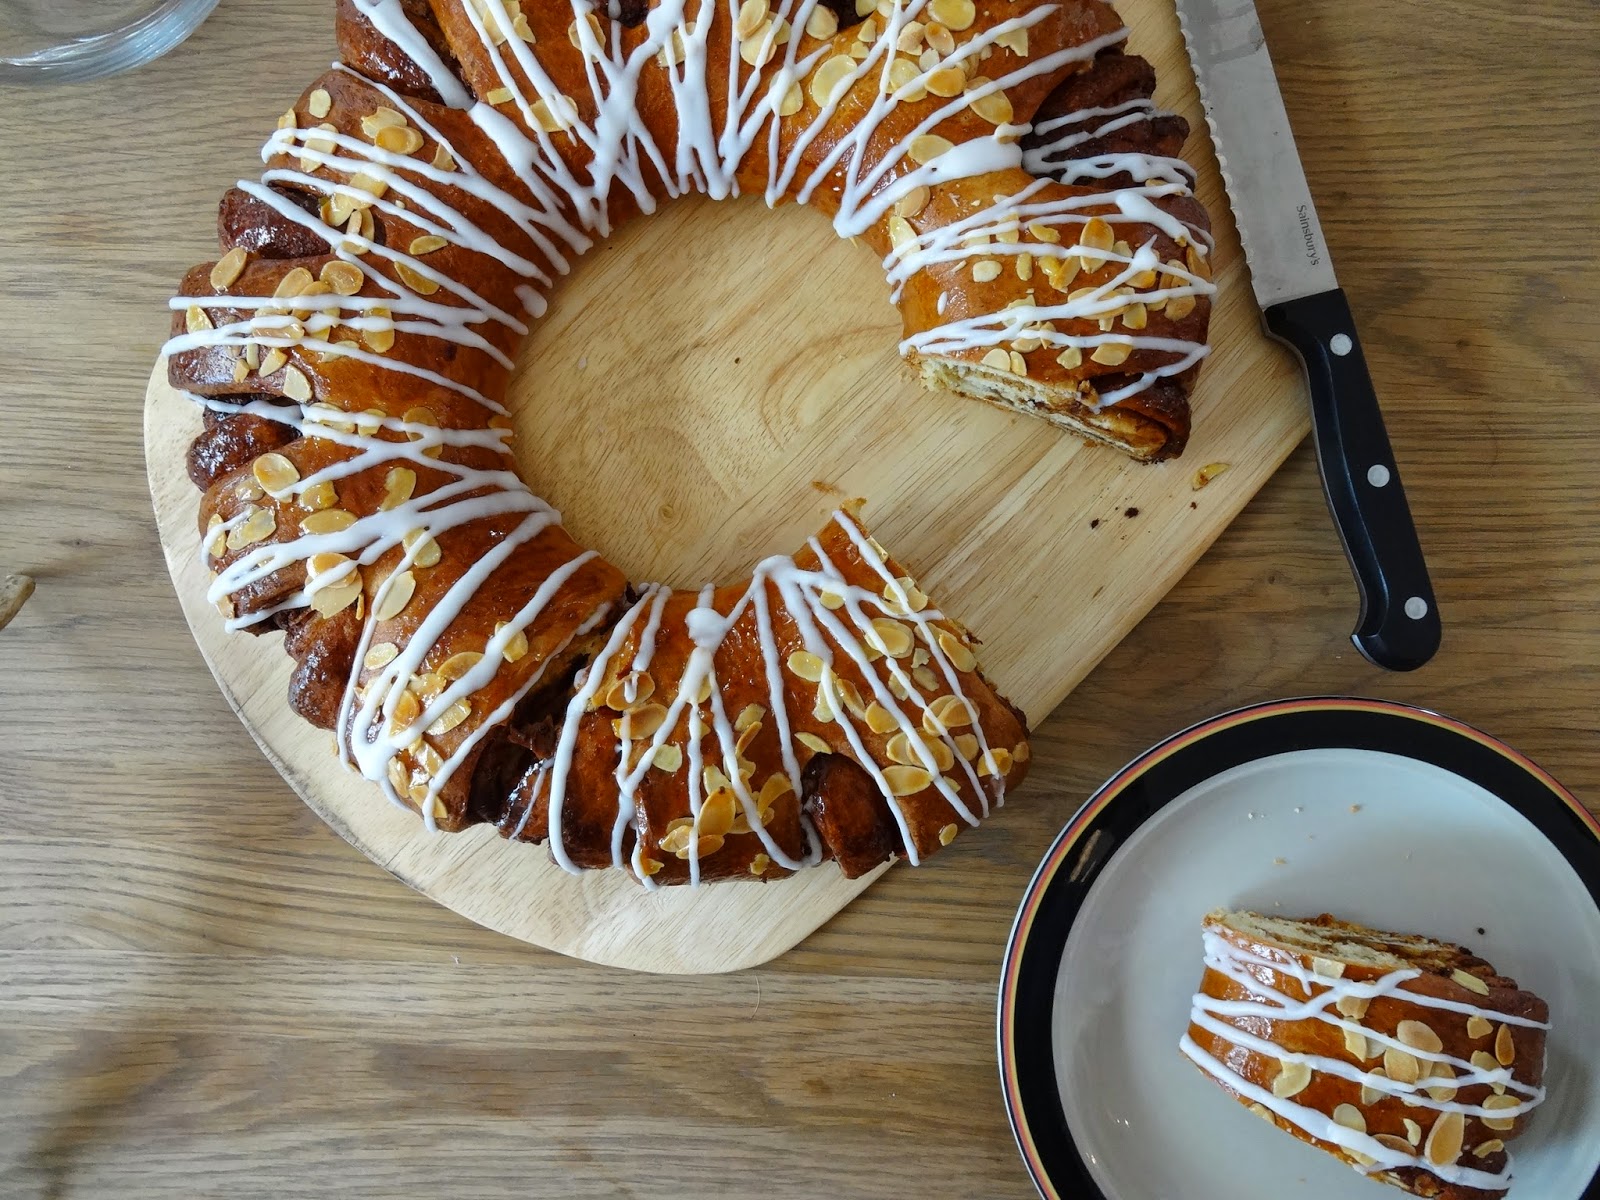
Hells yeah! It's Wednesday and the penultimate episode of The Great British Bake Off. I can't believe it's almost over. Sad times. But in other news I've been baking and made a monster of a Swedish Tea Ring, inspired by Richard the sheriff's signature bake.


This was an easier bake for me this week as I have made a lot of Korvapuusti (Finnish Cinnamon Buns). However my only worry was that the dough wouldn't cook properly, and we all know hell hath no mercy if Paul spots an under-baked dough (I remind you of the image that remains stuck on my kitchen fridge).

This recipe makes one ring, plus some extra individual buns. I put these ones in the freezer, ready to bake when I'm in need of a pick me up!

Ingredients

For the Dough


500ml Whole Milk

7g Sachet of Fast Action Yeast
2 Tablespoons of Ground Cardamom
140g Caster Sugar
1Kg Strong White Bread Flour
1 Medium Egg
1 Tsp Salt
150g Melted Butter
Flaked Almonds (50g approx)

For the Topping

100g Softened Butter
60g Dark Brown Muscavado Sugar
60g Caster Sugar
2 Tbsp Cinnamon

1) Warm the milk in a pan with the cardamom. You want it to be tepid, if you make it too hot it'll kill the yeast. Once you're happy with the temperature pour into a large bowl and add the yeast and sugar. Leave for around 5 minutes.

2) Whisk in the egg and the melted butter (again make sure it's not too hot). Then pour in the flour, a little at a time mixing in between. Once you've added all the flour, knead until the mixture comes together like a dough.

3) Place in a lightly oiled bowl and cover with cling film. Leave for one hour in a warm dark place until it has doubled in size.

4) Once you're happy with the rise, turn the dough out onto a lightly floured surface and knock the air out. You can do this by kneading for around a minute. Then you want to roll out the dough into a rectangle. Make sure that you have enough space for this, as it's a pretty big dough!

5) When you've got it to around 5mm thick (pretty thin!) spread the softened butter evenly over the rectangle (leave some space at the top edge - this just means that you wont have spillage when you roll it up).

6) Mix the sugar and cinnamon together and sprinkle on top of the butter.

7) You now want to roll this bad boy up. I like to try and get the rolls as tight as possible. I do this by using my thumb and my forefinger to roll the first half of the rectangle. I then roll the second half with my whole hand.

7) When you've finished this you'll have a big sausage (oi oi) of cinnamon bun goodness. Stretch it out gently if there are any unwanted bulges (oi oi). Then cut off the uneven ends.

8) At this point you'll also want to cut off about a quarter of the dough (this really depends on how big your baking tray is - and also on how many people you're baking this for). Then transfer the cinnamon sausage to a baking tray which has been lined with baking parchment.

9) Bring the two ends together and pinch with your finger tips. Then take a small sharp knife and cut into the ring in even parts. Pull apart these parts carefully. It should look like this...

10) Brush with beaten egg and sprinkle on flaked almonds (this part is optional). Then bake in the oven at 175c for 30-40 minutes. Keep an eye on it, and if you're happy with the colour, but not convinced it's cooked on the inside give it a little foil hat.

11) Whilst the tea ring is in the oven, you can then turn your attention to the rest of the dough. Cut down diagonally into the dough and then a cut diagonally again a bit further along but in the opposite direction (you want to be making a flat triangle shape). Once you've finished this, pull the top narrower end of the bun towards you and push down firmly with your forefinger. At this point I put my buns in the freezer, but if you want some immediately then bake them in the oven for 10-12 minutes at 175c.

12) Now going back to our amazing tea ring. It's quite hard to tell when an enriched dough is ready. I tested it by giving the top a little tap, if it sounds hollow it's done. I also gave point where the ring had been cut a bit of a prod. If it bounces back (slower than a sponge would) then again you're done!

13) Remove from the oven and allow to cool. Once cool heat up some apricot conserve in the microwave and brush onto the tea ring to give it a nice glaze.

14) Mix icing sugar and water together with a tiny splash of almond extract (optional). When it has reached a thick but drizzable consistency. Place into a piping bag and pipe over the tea ring.

15) Serve to family/ friends/ co-workers or even strangers on the street and prepare yourself for lots of 'ooos' and 'ahhhs.' Which, let's face it, is the best part of baking.

Phew! That was a long one (with innuendos ahoy). See you all tonight for The Great British Bake Off. Woop!


Monday 29 September 2014

Carrot and Cumin Soup

Well the summer has officially gone and the thick winter socks are on, and we all know what that means. Soup! I love me a bit of soup, perfect when you need warming up on a chilly autumn eve.

My mum used to always make the best carrot and lentil soup growing up, so for me it's the ultimate comfort food. I've put a little spicy twist to this family favourite though to give it a warming kick.

This like the majority of my recipes (bar my GBBO bakes) is super simple. The hardest graft is probably chopping up the veggies. It's also really flexible, the measurements are all pretty rough. I'll be honest I pretty much went with what was sitting in the fridge. If you're looking for a 5:2 version of this then just remove the honey and use less oil to cut down on the calories.

So let's get to it!

Ingredients

2 Tbsp of Olive Oil
1 Large Onion
2 Garlic Cloves (crushed)
2 Tsp Cumin Seeds
2 Tsp Ground Coriander
1 Tsp Chilli Powder
1 Tbsp Honey (optional)
500g Carrots
2 Celery Sticks
1 Litre of Veg or Chicken Stock

1) Start by roughly chopping up all the veg. Make sure the carrot is cut into fairly small chunks to make the cooking process a bit quicker.  

2) Cook the onions in the olive oil until soft. Add the cumin, coriander and chilli powder and cook for a couple more minutes.

3) Add the honey then the carrots and celery. Cook for around 5 minutes to soften the veggies.

4) Pour over your stock and leave to simmer for around 15 minutes or until the carrots and celery are fully cooked.

5 Blitz the mixture together until smooth. Serve with a big dollop of greek yoghurt and a few more cumin seeds sprinkled on top. Oh and not forgetting a big crusty wholemeal role (you gotta get that carb fix somehow!)